Wednesday, January 4, 2012

Custom Notebooks

Christmas was extremely hectic this year, more so than any year before. As you should know, I made all of the gifts this year... that, of course, added to the hecticness. But on top of that, we decided to split Christmases with both sides of the family this year. We live almost exactly in the middle  of them, with each side being 2 - 2.5 hours' drive in either direction. I think that driving both ways and back in two days would have killed us, so we drove to J's family's house for Christmas Eve, spent the entire day, and drove back late (though, that was not the intention) that night. Instead of driving in the other direction for Christmas with my family, they all came here. I suppose that entertaining for my side of the family is pretty interchangeable with another road trip when it comes to stress and exhaustion, but really in the end it was an awesome day. At least with my side of the family I don't feel the need to have a completely spotless and dust-free home, as I do with the in-laws. It's not that my mother-in-law is "like that"... she's not, but there's just a different pressure that I feel from my husband's mom than I do from my own. This is not the direction that I intended to go when I sat down to write. :) I planned on sharing my new project! 


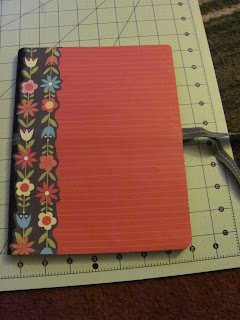
It's really very simple but has a lot of impact. I went to the Dollar Tree and picked up some composition notebooks, then came straight home to start digging through my massive scrapbook paper collection. For this project two different papers are needed, but I would recommend picking your papers from a stack or pad so that they will coordinate better. The base paper (which is the red in my case) should be 12x12, and the paper you use for the trim just has to be between 3 - 4 inches wide and tall enough to reach from the top of the notebook to the bottom. You'll also need some ribbon, but we'll get to that in a bit. Here's what I chose for the paper:                                                                                  


The pretty flowery paper is what I decided on using for the trim, so I went ahead and started cutting around the shapes into a border than is approximately 1.5 inches. When you're cutting your paper for the trim, you want to cut two pieces than are the same width... I'd suggest between 1.5 - 2 inches.


Here's a picture of everything together before I started cutting. I'm not sure why it came out sideways, as I'm sure I corrected that before uploading!! Either way, you get the idea:


Next is the ribbon. You want to choose a ribbon that is something that will tie into a pretty bow easily, and that is not too stiff. You can use ribbon that is wide... it does look nice, but it can also be a pain in the butt to tie. It's really up to you. For a thicker, wider ribbon use around a 36 inch length, but if you pick something much thinner you could get by with a length of 30 inches.Go ahead and take your ribbon, wrap it around your notebook, and match up the ends. Whether you want to use spray adhesive, glue, or Mod Podge is entirely up to you, but I found that Tacky Glue worked best for me.


The next thing you'll want to do is cut your "base" paper in half. Instead of your 12x12 paper, you will now have two 6x12 sheets.


 Spray, brush, apply your adhesive on to one piece of your 6x12 paper on top of the ribbon, matching the side and bottom edges. You will later trim off the excess.


Once the adhesive has dried, you'll open up the notebook, and from the inside use your craft knife to trim around the edges so you can match the curved edges of the book.


Next is the trim. Match up the bottom or top edge... it doesn't matter which, because you will be trimming off the excess for the trim as well. Here is the after:


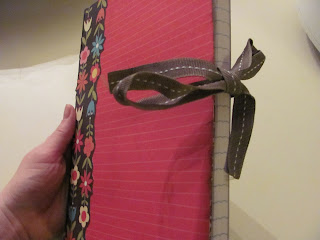
 You'll repeat the exact same steps on the back-side of the notebook, and any other added decorations are up to you!. I inked the edges of mine just a little bit and I'll probably find some journaling sticker later to put on the front. Here are other views of my new notebook!


I'll show off some others, too!


On that one, I used some pretty decorative tape to trim the edge... it does look a little frumpy and wrinkled, but in person it actually looks pretty cute. Here's another:


This next one cracks me up, and I'll tell you why - I let my 4-year old pick out her own colors. She was SO excited! I think her choices may crack you up to.... you'd think that she would pick out some hilarious color combination and animal prints, right? No, instead she picked out a lace "ribbon" and lavender/floral papers that I'm just sure that my great-grandmother would have loved. See?


She loves it though. And, for good measure, here is a picture with all four of my newest creations lined up together, hanging out next to my slow cooker...


Once again, unsure why it's turned sideways. That doesn't matter though... you get the idea. Voila! I'd like to add that one thing I didn't cover in this post is that since most of the comp notebooks come with graphs and charts and text on the inside covers most of the time, you could use the same method to cover the inside that we used to cover the outside. The notebook with the sunset picture on it is actually my meal planning notebook, and I plan on adding envelopes to the inside covers, one for coupons, and one for shopping lists. (It gets far more complicated that than, so maybe it will have its own post one day. :) )

Thursday, December 15, 2011

[Southern Lights]

We started off our day by just being lazy and hanging around the house. In the early afternoon we decided to finally get off of our bottoms and go run some errands. We ended up at Micheal's, where they had a HUGE sale on their Christmas foam crafts. I found some awesome little Christmas trees and ornament stickers for a couple bucks each, so we picked those up and had a great time piecing everything together! I punched holes in the tops of the trees so we could string them up and make a garland. M had so much fun :)


After we finished, M, dad, and I all hopped in the car to go to Southern Lights. They have this awesome setup at the horse park with millions of Christmas lights... it takes probably 10-15 minutes to drive through... I'm not really sure what the distance is. At the end of the driving tour, it spits you out into the parking lot for the visitors center, which is where they have a bunch of fun Christmas activities to enjoy. They have model trains, a petting zoo, pony and camel rides, a mini-train ride, arts and crafts vendors, awesome refreshments like kettle corn, hot chocolate, and funnel cakes, and you can even visit with Santa. We've been going to this for the past 4 or 5 years, and I always look forward to it! I took lots of pictures this year:


The last picture is from the mini-train ride. Can you tell that she was super-excited??

We are seriously getting into the Christmas spirit around here! I think next on our list should be making a gingerbread house. I am SO GLAD I made the choice to quit working right before the holidays. Man, it sure feels good to actually enjoy the holiday season for once!

Wednesday, December 7, 2011

More Gifting

I didn't realize that it had been so long since the last post. Three weeks! I'm still not in a routine. It's almost like I still think I'm on vacation, even though I haven't worked for nearly 2 months. I think that I had worked so hard for so long that it's making me want to make up for all of that now. Hah! I have been very busy, though. I'm still in serious Christmas crafting mode. I'm nearly done with my first major gift basket. It is INCREDIBLE. Not to toot my own horn or anything, but seriously. It is incredible. I made monogrammed coasters (with my amazing Silhouette SD), a coffee mug with a coordinating monogram with 2 bags of homemade hot chocolate on a stick, homemade microwave popcorn, peppermint bark, homemade playdough for the kiddo, a Santa key, homemade brown sugar scrub for the momma, and a homemade caramel sauce. Did you catch a theme? Yes, everything is homemade.

I made a cute little custom clipboard for my 5-year old niece. She's very in to school, and loves practicing her letters and numbers. I thought it would be a lot of fun to give her a personalized clipboard with a pencil attached so she can carry it around the house to have something to bear down on while she practices.

I took a really pretty piece of scrapbook paper, and measured it against the clipboard. I marked the corners with a pencil, and just made simple cuts with a craft knife. 


I used some spray adhesive and matched up all of the edges. Unfortunately I am not good  suck at cutting around the actual "clip" part of a clipboard. I've tried it before and it was a total failure. I'm playing it safe here by leaving the top part uncovered.


After that, I found some coordinating paper to trim the edge. I measured the edge and corner on the right side, then cut around the cute little flowers. Once again using the spray adhesive, I attached the border to the side.


After that, I found some polka-dot stickers to spell out her name so I could personalize it for her.


What I ended up doing with the top was wrapping some brown grosgrain ribbon around the top and tying a pencil to it with some jute. I'll add a picture soon of the finished product. So cute!

Next on my list of to-do's: more coasters, more personalized coffee mugs, felt finger puppets, homemade dog treats, and snow globes.

So much to do!! I'll finish up now so that I can get my rest! I have a very busy next two days ahead of me.

Thursday, November 17, 2011

More Christmas Gifting

So, tonight I decided that I would try some homemade playdough. I figured that I would probably end up making a couple of batches with a couple of different recipes before I decided which one was easiest/I liked best. I was completely wrong. The very first one that I came to, which can be found here, worked perfectly well. There are several recipes on this website, but I went with my gut and used the first one. I, luckily, had already been planning on making some playdough, so I went to the Dollar Tree yesterday and picked up some amazing containers.


It's funny how perfect they are... I made 7 complete batches of playdough today, using that very recipe that I linked, AND each batch fits into exactly 6 of these containers. It's almost like they were meant for each other. Hah! I ended up going back to the Dollar Tree this evening for 4 more packages, a total of 6, and now I have some left over... but I'm super- happy about this because I know I'll find another amazing use for them. I'll tell you later what I'm even happier about.


Here are the ingredients... one cup of flour, 1/2 cup of  salt, 1 Tbsp of cream of tartar, 1 Tbsp of oil (the recipe calls for vegetable oil, but I used canola oil), and food coloring.


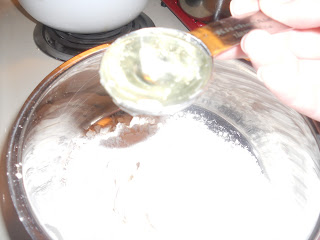
First, add the salt in a small or medium saucepan:


Then the flour:  


Of course, if you're feeling crazy you could probably do the flour first, and the salt second. But only if you're feeling crazy.

 Add the cream of tartar:


The oil:


Finally the water. We didn't take a picture of the water. I'm going to assume that we all have a good mental image of water in a measuring cup and proceed to the food coloring.


I actually added a few more drops of blue after I stirred this up a bit, and the end result was very nice.


I made sure that all of my ingredients were mixed very well before turning on the heat. This gave me an opportunity to work through all of the flour clumps that had formed before the mixture started to morph into a solid.  You want to make sure that you use either the low or medium heat setting on your burner, and definitely no higher. Keep stirring from start to finish, otherwise you may have a lot of trouble keeping things consistent... I noticed that at one point when I turned my back to put some wax paper down on the counter (so that I could leave the playdough to cool when it was done), which took all of 30 seconds, my playdough started to form massive clumps around the inside edges of my saucepan, while the center was still very much a liquid. It took a lot of hard stirring and manipulating to come back from that. I'd say it took a good 3 or 4 solid minutes of stirring with each batch to get to the perfect consistency. You'll know when you reach that point, for sure. It's really, really easy to stir for more than half of the time you're standing there, then suddenly it begins to require a bit of elbow grease... this is a good sign. You know you're almost finished at this point.

Your pot will probably look like this:


 As soon as mine was ready to come off the stove, I spooned the mixture out onto a sheet of wax paper to let it cool out before kneading and dividing into those precious little containers.  


Pretty soon I had a massive wall of playdough. I made one without any food coloring for two reasons. The first was because M has been talking nonstop about making a playdough pizza, and I definitely had to provide her with a suitable crust. What I didn't know then was that she considers PINK to be the most suitable crust color. Hmph. My other reason was so that I could have enough playdough to fill my playdough canisters.


You see that sock monkey thing in the background? That's my playdough canister. Otherwise knows as a PRINGLES CAN!!! And that is what I am SO happy about. My husband sometimes thinks it's odd when I ask him to save random things... like a Pringles can, empty oat canisters, or emptied salsa jars. When he came home from work last night, and I was able to show off my upcycling genius, it all started to make a little bit of sense to him. We have a dear friend who has a "thing" for sock monkeys, so we had picked up some sock monkey ribbon and sock monkey scrapbook paper a few weeks ago. I wasn't sure at all at the time what we would do with them... but then, last night, everything fell together when I realized that scrapbook paper would perfectly cover the Pringles can, making the most awesome playdough container ever.


I realize the image isn't that great, but I was having some major issues with the flash in the kitchen. Believe me, in person, it's ridiculously cute. I'm excited to finish all of them. I take that back, I won't lie. I'm excited to eat more Pringles.