Christmas was extremely hectic this year, more so than any year before. As you should know, I made all of the gifts this year... that, of course, added to the hecticness. But on top of that, we decided to split Christmases with both sides of the family this year. We live almost exactly in the middle of them, with each side being 2 - 2.5 hours' drive in either direction. I think that driving both ways and back in two days would have killed us, so we drove to J's family's house for Christmas Eve, spent the entire day, and drove back late (though, that was not the intention) that night. Instead of driving in the other direction for Christmas with my family, they all came here. I suppose that entertaining for my side of the family is pretty interchangeable with another road trip when it comes to stress and exhaustion, but really in the end it was an awesome day. At least with my side of the family I don't feel the need to have a completely spotless and dust-free home, as I do with the in-laws. It's not that my mother-in-law is "like that"... she's not, but there's just a different pressure that I feel from my husband's mom than I do from my own. This is not the direction that I intended to go when I sat down to write. :) I planned on sharing my new project!
It's really very simple but has a lot of impact. I went to the Dollar Tree and picked up some composition notebooks, then came straight home to start digging through my massive scrapbook paper collection. For this project two different papers are needed, but I would recommend picking your papers from a stack or pad so that they will coordinate better. The base paper (which is the red in my case) should be 12x12, and the paper you use for the trim just has to be between 3 - 4 inches wide and tall enough to reach from the top of the notebook to the bottom. You'll also need some ribbon, but we'll get to that in a bit. Here's what I chose for the paper:
The pretty flowery paper is what I decided on using for the trim, so I went ahead and started cutting around the shapes into a border than is approximately 1.5 inches. When you're cutting your paper for the trim, you want to cut two pieces than are the same width... I'd suggest between 1.5 - 2 inches.
Here's a picture of everything together before I started cutting. I'm not sure why it came out sideways, as I'm sure I corrected that before uploading!! Either way, you get the idea:
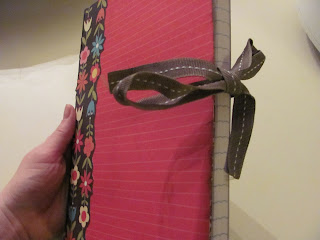
Next is the ribbon. You want to choose a ribbon that is something that will tie into a pretty bow easily, and that is not too stiff. You can use ribbon that is wide... it does look nice, but it can also be a pain in the butt to tie. It's really up to you. For a thicker, wider ribbon use around a 36 inch length, but if you pick something much thinner you could get by with a length of 30 inches.Go ahead and take your ribbon, wrap it around your notebook, and match up the ends. Whether you want to use spray adhesive, glue, or Mod Podge is entirely up to you, but I found that Tacky Glue worked best for me.
The next thing you'll want to do is cut your "base" paper in half. Instead of your 12x12 paper, you will now have two 6x12 sheets.
Spray, brush, apply your adhesive on to one piece of your 6x12 paper on top of the ribbon, matching the side and bottom edges. You will later trim off the excess.
Once the adhesive has dried, you'll open up the notebook, and from the inside use your craft knife to trim around the edges so you can match the curved edges of the book.
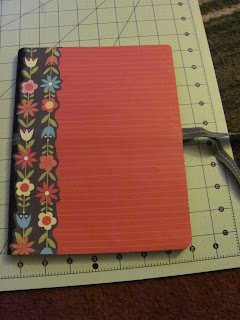
Next is the trim. Match up the bottom or top edge... it doesn't matter which, because you will be trimming off the excess for the trim as well. Here is the after:
You'll repeat the exact same steps on the back-side of the notebook, and any other added decorations are up to you!. I inked the edges of mine just a little bit and I'll probably find some journaling sticker later to put on the front. Here are other views of my new notebook!
I'll show off some others, too!
On that one, I used some pretty decorative tape to trim the edge... it does look a little frumpy and wrinkled, but in person it actually looks pretty cute. Here's another:
This next one cracks me up, and I'll tell you why - I let my 4-year old pick out her own colors. She was SO excited! I think her choices may crack you up to.... you'd think that she would pick out some hilarious color combination and animal prints, right? No, instead she picked out a lace "ribbon" and lavender/floral papers that I'm just sure that my great-grandmother would have loved. See?
She loves it though. And, for good measure, here is a picture with all four of my newest creations lined up together, hanging out next to my slow cooker...
Once again, unsure why it's turned sideways. That doesn't matter though... you get the idea. Voila! I'd like to add that one thing I didn't cover in this post is that since most of the comp notebooks come with graphs and charts and text on the inside covers most of the time, you could use the same method to cover the inside that we used to cover the outside. The notebook with the sunset picture on it is actually my meal planning notebook, and I plan on adding envelopes to the inside covers, one for coupons, and one for shopping lists. (It gets far more complicated that than, so maybe it will have its own post one day. :) )


No comments:
Post a Comment